DIY MTM computer speakers…
After the garage sound system came out so nice I decided to take a shot at making a setup for our desktop computer upstairs in the office. This is the computer that I use for all of my Blender work/tutorials and it’s also next to the keyboard where I practice. This all means that the sound system up there gets used quite a bit. Attached to it now is a cheap $20 2.1 setup, which sounds OK, but I thought I could do much better with a home-made speaker setup.
I already have a decent headphone amp up there, that conveniently enough has speaker outputs, the NuForce Icon 2. At 4 Ohms it puts out about 24w per channel, so the speakers need to be fairly small and efficient. I decided on the HiVi M3N full range drivers which have excellent reviews online. To give a little more oomph to the setup I’m going with two woofers per side in an MTM arrangement with the Dayton ND20 tweeter. To begin with I’ll probably use the sub from the existing 2.1 setup. I also have most of the other crossover components from previous builds, so grand total for parts this build comes to about $75. Should be a pretty fantastic sound for $75!
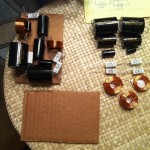 The first step is to build the crossovers. I’m following Wolf’s Switch plans pretty closely, so I’m going to use that crossover design. Here is the layout on the crossover with one put together and one waiting to be glued to the cardboard. The cardboard pieces are about 4 x 5 inches, small enough to fit in the planned cabinet.
 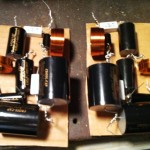 The next pictures shows both put together, glued up and all soldered. I connected them to the speakers and tweeter on the bench and they both seemed to work, so fingers crossed when I put them in the cabinets they still work!
The next step is the cabinet. The drivers are small little things, so the cabinet will also be pretty small. It’ll be about 6.2 ltrs sealed MDF. The top, sides, and bottom I’m making out of 1/2″ MDF and the front baffle and back will be 3/4″ MDF to give the flush mounted drivers some mounting room.
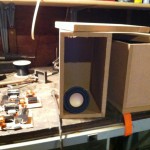 Here is a shot of the construction so far without the baffle put on. It’s pretty straight forward to this point, just cutting and gluing together. With the Aura monitor cabinets for the garage I had a heck of a time trying to get all of the pieces cut to the same size. I tried like crazy to do it, but a small difference when cutting creates a 1/16′ or 1/8″ change in size, which when finishing is tricky to sand out (I don’t have a belt sander). So, for this build I decided to cut everything about 1/8″ large on all sides and flush trim them with a router. Worked wonders! They look great so far.
The front frame that the baffle will mount to wasn’t perfectly flat, (because of said difficulties cutting) so I needed to come up with a way to make all the faces flush. It would be fairly easy if I had a router table, but no dice there and I don’t really have the room to put one up in the garage anyway. 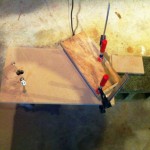 I decided to build my own temporary router table, which came out OK despite the thrown together nature of it. The table is made out of a piece of 3/4″ MDF mounted to the base of the router with a few long bolts. It was pretty lopsided, so I stuck a cinder block under the other side of the base and clamped a quick fence to the side and cinder block together. I threw it together in less than an hour, with parts around the garage, so all in all I’m happy with it.
 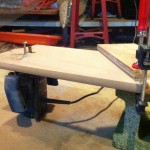 It worked pretty well too, so I think I’ll keep this piece of MDF. Next time I may flush the bolts into the top though, they sort of got in the way while cutting as the heads are pretty large.
The next step is cutting the holes in the baffle and then testing everything out before I seal it up. Judging by the looks of the backs of the M3N and ND20 they may require some fancy cutting, but I’ll keep you updated!

Leave a Reply